Tasty Turkey Broth
 Tasty Turkey Broth
Don’t throw away the turkey carcass. Pick all the meat off of it that you can to use for a variety of other recipes. If you don’t want to deal with with the meat right away, chop it up and freeze it in manageable small portions.
Homemade broth is the best. You’ll be amazed at just how astonishing the taste difference is using homemade broth versus mass produced store bought. Don’t worry about putting your best vegetables into the broth pot. If you use organic vegetables, don’t peel them, just rinse and chop. The point is to simmer all the flavor out of them. If you don’t have a few ingredients, don’t worry.
Broth is very forgiving. I don’t use lemon in my broth, but some people do. If you want to toss some ingredients that I don’t use in, if it makes sense, give it a try.
 |
The following ingredients are required:
1 turkey carcass, need not be intact
turkey skin and any remaining giblets
(in other words, the bones, meat bits, skin, any part of the bird you don’t care to eat)
2-6 cloves garlic, unpeeled and crushed
2-4 stalks of celery, with leaves, coarsely chopped or broken into 3 inch sticks
2-4 carrots, broken into 3 inch sticks
2-3 onions, cut into wedges
1-3 tsp Kosher or sea salt
A few turns of fresh ground black pepper
water to cover
The following ingredients are OPTIONAL:
½ tsp basil
½ tsp parsley
2-4 whole peppercorns
2 cups dry white wine
About ½ cup stuffing from a whole turkey (try it!)
 |
A big pot 8 – 12 quart at least
The usual assortment of measuring cups/spoons
Good sharp knife
Cutting board
Cheesecloth
Colander
Something to skim with — either triple layer of paper towels (careful you don’t get burned!) or a nice flat spatula/spoon/strainer spoon wrapped in paper towels
 |
You don’t want to use your very best vegetables to make a broth. You are going to discard every bit of the vegetables once the broth is complete. Try reserving aside your “little bit wilted” celerey sticks or your “day old” carrot sticks and maybe even the onion that has started to sprout at the bottom of the onion bin for making stocks and broths.
Some cooks like to take a meat tenderizing hammer to the carcass to crack the bones in order to expose the marrow. It doesn’t hurt and might help reduce the volume of a big carcass to fit into a smaller pot.
Get everything chopped, sliced, diced (and maybe break the bones) and go for it.
You don’t have to peel or neatly slice anything. Just break it up into chunks.
 |
Good broth needs to simmer for at least 7 or 8 hours before you serve it. The best is if you can cool it overnight.
Put all the ingredients in a 8 to 12-quart tall stock pot. Add enough cold water to cover by 3 inches. Bring to a gentle simmer, partially cover, and simmer 5 to 6 hours. The longer it cooks, the richer the taste. Keep the solid ingredients covered with liquid.
Check on it every half hour or so. Keep the solid ingredients covered by about 3 inches. If you are losing more than a cup or so every thirty minutes, you probably have it too hot. Back off of the heat a fraction.
When it’s done, you’ll probably know by the smell. The celerey should look almost white.
Let it cool. Skim any fat from the broth. You can do this by running a folded paper towel over its surface or by skimming it with a slotted spoon or flat spatula wrapped in a paper towel. Discard the toweling and taste the broth for seasoning. If it is way off, season the broth, bring it back to a boil, simmer for at least 30 minutes, and let it cool again.
Strain out the broth. Use a double layer of cheesecloth over a collander over a clean pot. Slowly strain the broth. When the cheesecloth is full, gather the corners and twist the cheesecloth cache tight to squeeze out all the delicious broth. You may want to strain the broth again depending on how it looks to you.
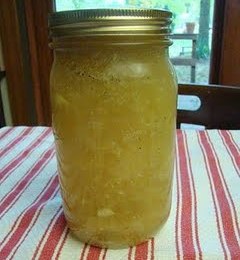
Pour the broth into large jars (I use a Mason style jar) and refrigerate it overnight. In the morning or the next evening when you get back to the broth, the fat will have solidified at the top so you can just spoon it off. Generally, the broth will be very thick and jelly-like which is perfect.
Keep the broth a week or two in the refrigerator for weeks or freeze it for up to six months. If keeping the broth in the refrigerator, bring it to a boil every few days and simmer for a few minutes to keep it from spoiling.
 |
6-8 quarts
 |
~*~ | |
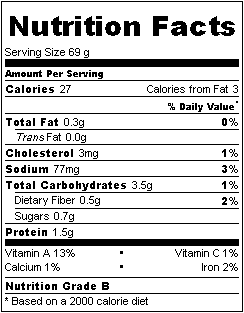
| Very high in vitamin A High in selenium Low in saturated fat |
 |
|
| ~*~ | ||
 |
You can, of course, follow the same basic recipe for chicken broth. Of course, I would use a few birds in that case.
White wine is optional, but alcohol releases the widest range of flavors, ones that aren’t soluble in water or fats alone. Most of the alcohol cooks off and the tastes it opens up make for a fine broth. Cooking wines make your broth taste more like vinegar. Instead, use an inexpensive, but drinkable Chardonnay, Sauvignon Blanc, Pinot Grigio, or other dry white wine.
I would love to hear any feedback about this recipe. Did you make it? Did you enjoy it? Did you make any adjustments to it?
Hallee
I’m so grateful for your visit, today.
You would bless me if you added me to your ![]() feed reader or subscribed
feed reader or subscribed  via email.
You can also become a fan on ![]() Facebook or follow me on
Facebook or follow me on ![]() Twitter. I would love to see more of you!
Twitter. I would love to see more of you!


Hi Hallee!
I have just discovered your site today and it is a wealth of information!
I just have a quick question. My husband and I really only like the breast of a chicken or turkey (I know, most people like more than just that, but we both have a mental aversion to other parts!). Therefor, I never buy a whole bird because so much of it would go to waste (and I would have NO idea what to do with the whole thing!). Do you have any suggestions of what I could do to make broths without it – or should I start asking friends and relatives for their carcasses?
Thanks!!!
If you buy the breast on the bone, you could use the bones of the breast to make broth. Just freeze the skin and bones until you have several, and then put them in the pot as if you had a whole carcass.