Perfect Pocket Pita Bread
 Perfect Pocket Pita Bread
I intend to make this recipe with whole wheat flour this week, but for now I only have ever made it with unbleached all purpose flour or with white bread flour. I will update the recipe after I play around with it some more. This recipe makes a nice pocket you can stuff to make gyros, shwarmas, or fun PBJs for school functions.
 |
3 cups flour (I use fresh ground hard wheat)
1 ½ tsp salt
1 TBS honey
1 packet active dry yeast (or 2 ¼ tsp yeast)
1 to 1 1/4 cups room temperature water
2 TBS olive oil
 |
bowl
measuring cup/spoons
wooden spoon
rolling pin
baking stone or cookie sheet
 |
Mix yeast with honey and 1 ¼ cup water. Let stand 5 minutes.
 |
Sift together flour and salt. Add to yeast mixture, add olive oil. Stir with a wooden spoon until it forms a ball (adding more water if needed.) Place on lightly floured surface and kneed for 10 minutes. (If you are using a stand mixer, using a bread hook mix for 3 minutes on speed 2.)
Place dough in greased glass bowl and turn it so that both sides are greased. Cover with a towel and let it rise in a warm spot free from drafts until doubled in size (60-90 minutes).
Punch dough down and divide into 8 pieces. Roll each piece into a ball. Cover with a towel and let rest for 20 minutes.
While the dough is resting, preheat oven to 400° degrees F. Put either a baking stone (or an upside down cookie sheet) on the middle rack of the oven while it’s preheating.
On a lightly floured surface, roll each ball of dough out to a ¼ inch thick.
Open the oven and place as many pitas as will fit on your baking surface. Bake 4-5 minutes. They will puff up and turn crispy and brown.
Serve with your favorite filling. I will be linking some lamb fillings, chicken fillings, and hummus as I type up the recipes.
 |
8 pitas
 |
~*~ | |
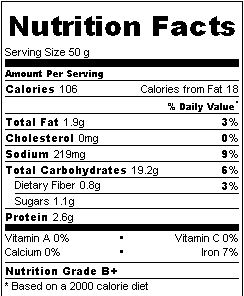
| High in selenium High in thiamin Low in saturated fat No cholesterol |
 |
|
| ~*~ | ||
 |
Using a cast iron skillet on top of a cast iron skillet, you can re-heat these and press them flat, then cut into fourths and serve with a Greek salad.
I would love to hear any feedback about this recipe. Did you make it? Did you enjoy it? Did you make any adjustments to it?
Hallee
I’m so grateful for your visit, today.
You would bless me if you added me to your ![]() feed reader or subscribed
feed reader or subscribed  via email.
You can also become a fan on ![]() Facebook or follow me on
Facebook or follow me on ![]() Twitter. I would love to see more of you!
Twitter. I would love to see more of you!


I have always wanted to try and make my own pita bread. These look beautiful! :) I can’t wait to hear how the whole wheat turns out. I’ve found it a little… well, difficult to work with at times. When I finally get a recipe to work with it though, it is so worth it!
think i have pita success…well at least better than the first time i did it!
Have you done this with the fresh ground whole wheat? I attempted it today, but to no avail. It makes a doughy flat bread, but did not puff up like I was hoping. Not sure what to tweak.
Yes – I have. However, it doesn’t puff up perfectly. The first two will puff nicely, but the remaining do not. I don’t know if I need to let the stone re-heat or what. It’s still really good, and I make it all the time.
I don’t have much success with the puffing when I put in more than about 1/3 of the flour as freshly ground whole wheat, and periodically one or two won’t puff either. My solution is to just make twice as many as I need and use the puffed ones as pitas and the flat ones are just “flat bread” to spread honey on or dip in hummus. :) They’re all tasty no matter what, but the flat ones aren’t as fillable with all the veggies and sprouts.
That’s a great idea.
I use 100% fresh ground wheat now and usually only the first half of them puff up, then they don’t. I’ve never figured it out as to why.